
This manual provides a comprehensive guide for installing the Goodman AMST series, ensuring energy efficiency and proper system setup. It covers key features, safety, and compliance standards.
1.1 Overview of the AMST Series
The Goodman AMST series offers energy-efficient, multi-position air handlers designed for flexibility and performance. These units feature factory-installed components like thermal expansion valves and multi-speed ECM blower motors, ensuring reliable operation. Built for various applications, the AMST series provides consistent airflow and precise temperature control, making it a versatile choice for modern HVAC systems. Its design emphasizes durability and efficiency, catering to both residential and light commercial needs.
1.2 Importance of Proper Installation
Proper installation of the Goodman AMST series is crucial for optimal performance, efficiency, and safety. Incorrect setup can lead to reduced system lifespan, increased energy costs, and potential safety hazards. Adhering to the manual ensures compliance with manufacturer specifications, warranty validation, and reliable operation. Proper installation also enhances indoor air quality and system durability, making it essential to follow guidelines strictly. A licensed contractor should perform the installation to guarantee adherence to safety standards and optimal functionality.

System Components and Features
The Goodman AMST series includes advanced components like factory-installed thermal expansion valves, multi-speed ECM blower motors, and energy-efficient designs for optimal performance and reliability.
2.1 Key Components of the AMST Series
The AMST series features a direct drive, multi-speed ECM blower motor, internal thermal expansion valves, and a corrosion-resistant drain pan. These components ensure efficient airflow, reliable cooling, and quiet operation. The system is designed for multi-position installation, providing flexibility for various applications. Additionally, the factory-installed features enhance performance and simplify installation processes, making it a robust choice for modern HVAC needs. Proper installation ensures optimal functionality and energy savings.
2.2 Factory-Installed Features
The AMST series includes factory-installed thermal expansion valves for precise refrigerant flow and multi-speed ECM blower motors for efficient airflow. These features enhance system performance and reduce installation complexity. They ensure compatibility with heat pumps and cooling systems, providing reliable operation. The valves and motors are designed to optimize energy efficiency, making the AMST series a cost-effective and high-performance solution for HVAC applications. These pre-installed components minimize field adjustments and streamline the setup process.
2.3 Energy Efficiency and Multi-Position Design
The AMST series is designed for high energy efficiency, featuring advanced components that minimize energy consumption while maintaining optimal performance. Its multi-position design allows for flexible installation, accommodating various spaces and configurations. This versatility ensures the system can be adapted to different home layouts, providing consistent comfort and energy savings. The combination of energy efficiency and installation flexibility makes the AMST series a practical and eco-friendly solution for modern HVAC needs.
Safety Precautions and Guidelines
Adhere to safety instructions to prevent accidents during installation. Proper handling and storage ensure system integrity and personal safety, following all manufacturer guidelines and regulations.
3.1 General Safety Instructions
Always disconnect power before starting installation to ensure safety. Wear protective gear like gloves and goggles. Follow all manufacturer instructions carefully, and avoid operating the system in hazardous environments. Proper ventilation is essential to prevent gas leaks or electrical risks. Never tamper with safety devices or bypass critical safeguards. Ensure the system is grounded correctly to prevent electrical hazards. Refrigerant handling requires strict adherence to safety protocols to avoid exposure. Compliance with local codes and regulations is mandatory for a safe installation. If unsure, consult a licensed professional.
3.2 Handling and Storage Tips
Handle the AMST unit with care to avoid damage. Store in a dry, secure location away from direct sunlight and moisture. Keep units upright to maintain internal components. Ensure all packaging materials are intact during storage. Inspect for damage before installation and follow manufacturer guidelines. Avoid exposing units to extreme temperatures or humidity. Use original packaging for transport to prevent scratches or dents. Store small components in sealed bags to avoid loss. Regularly clean and inspect stored units to ensure readiness for installation.

Site Preparation and Requirements
Ensure the site is level, dry, and clear of obstructions. Verify electrical and plumbing connections meet specifications. Check local building codes for compliance before installation.
4.1 Indoor and Outdoor Unit Placement

Place indoor units in well-ventilated areas, avoiding direct sunlight and moisture. Outdoor units should be installed on a firm base, ensuring adequate airflow and drainage. Maintain recommended clearances around both units to optimize performance and comply with safety standards. Ensure units are level to prevent refrigerant leaks and ensure proper operation. Proper placement enhances efficiency, durability, and system reliability, adhering to Goodman’s specifications for optimal functionality.
4.2 Electrical and Plumbing Requirements
Ensure all electrical connections meet local codes and manufacturer specifications. Use appropriately rated circuit breakers and GFCI outlets for outdoor units. Plumbing must include properly sized refrigerant lines and condensate drain connections. Verify voltage compatibility and phase requirements to prevent system damage. Follow the wiring diagram for correct connections, and ensure all components are grounded. Proper electrical and plumbing setup is crucial for safe, efficient operation, and compliance with installation standards outlined in the Goodman AMST manual.

Installation Steps and Procedures
Follow detailed pre-installation checks, mount the unit securely, and connect electrical and refrigerant lines precisely. Ensure proper leveling and tighten all connections for optimal performance and safety.
5.1 Pre-Installation Checks
Verify the unit’s condition, ensure compatibility with existing systems, and review electrical and plumbing requirements. Check site accessibility, proper spacing, and alignment with local codes. Consult airflow tables for accurate settings, ensure all components are included, and prepare gauges for pressure checks. Follow safety guidelines and manufacturer instructions to avoid installation issues and ensure compliance with warranty terms. Proper preparation ensures a smooth and efficient installation process.
5.2 Mounting and Leveling the Unit
Ensure the unit is securely mounted on a level surface using appropriate hardware. Check the bubble level to confirm proper alignment. Adjust the mounting frame if necessary to achieve even balance. Verify that the drain pan is correctly positioned and sealed. Tighten all fasteners according to torque specifications; Ensure the unit is plumb and level to prevent vibration and ensure efficient operation. Follow manufacturer guidelines for precise installation to maintain warranty validity and optimal performance. Proper leveling is critical for system stability and longevity. Always refer to the installation manual for specific torque values and alignment instructions to avoid installation errors and ensure compliance with safety standards. This step is crucial for the overall functionality and durability of the Goodman AMST system. By adhering to these guidelines, you ensure a stable and efficient operation, minimizing the risk of future malfunctions. Proper mounting and leveling also contribute to reduced noise levels and even airflow distribution, enhancing the system’s performance and user satisfaction. Always double-check the unit’s position and alignment before proceeding to the next installation steps. This attention to detail ensures a professional-grade installation that meets both safety and efficiency standards. Additionally, consult the airflow tables provided in the manual to confirm that the unit’s positioning aligns with the recommended specifications for your specific model. This ensures that the system operates within its designed parameters, providing the best possible performance and energy efficiency. By following these steps, you can ensure that the Goodman AMST unit is installed correctly, safely, and efficiently, meeting all necessary codes and regulations. Remember, improper mounting or leveling can lead to premature wear, reduced efficiency, and potential safety hazards, making this step one of the most critical in the entire installation process. Always prioritize precision and adherence to the manufacturer’s instructions to guarantee a successful installation.
5.3 Connecting Electrical and Refrigerant Lines
Connect electrical lines according to the wiring diagram, ensuring all terminals match the manual’s specifications. Secure connections tightly to prevent loose contacts. For refrigerant lines, use appropriate flare nuts and torque them as specified. Inspect for leaks using a halogen leak detector. Ensure the system is evacuated before charging with refrigerant. Follow manufacturer guidelines for proper line sizing and routing to maintain efficiency. Always refer to the installation manual for specific instructions to ensure compliance with safety and performance standards. Proper connections are vital for system reliability and energy efficiency, so double-check all connections before activating the unit. This step is crucial for the overall functionality and safety of the Goodman AMST system. By adhering to these guidelines, you ensure a secure and efficient operation, minimizing the risk of future malfunctions and potential safety hazards. Additionally, consult the airflow tables provided in the manual to confirm that the unit’s positioning aligns with the recommended specifications for your specific model. This ensures that the system operates within its designed parameters, providing the best possible performance and energy efficiency. Always prioritize precision and adherence to the manufacturer’s instructions to guarantee a successful installation and meet all necessary codes and regulations. Proper connections also contribute to reduced noise levels and even airflow distribution, enhancing the system’s performance and user satisfaction. Remember, improper connections can lead to premature wear, reduced efficiency, and potential safety hazards, making this step one of the most critical in the entire installation process. Ensure all connections are tested and verified before proceeding to the next step. This attention to detail ensures a professional-grade installation that meets both safety and efficiency standards. By following these steps, you can ensure that the Goodman AMST unit is installed correctly, safely, and efficiently, meeting all necessary codes and regulations. Always double-check the connections and lines for any signs of damage or leaks to guarantee optimal performance and longevity of the system. This step is essential for the overall functionality and reliability of the Goodman AMST system, ensuring it operates efficiently and safely for years to come.

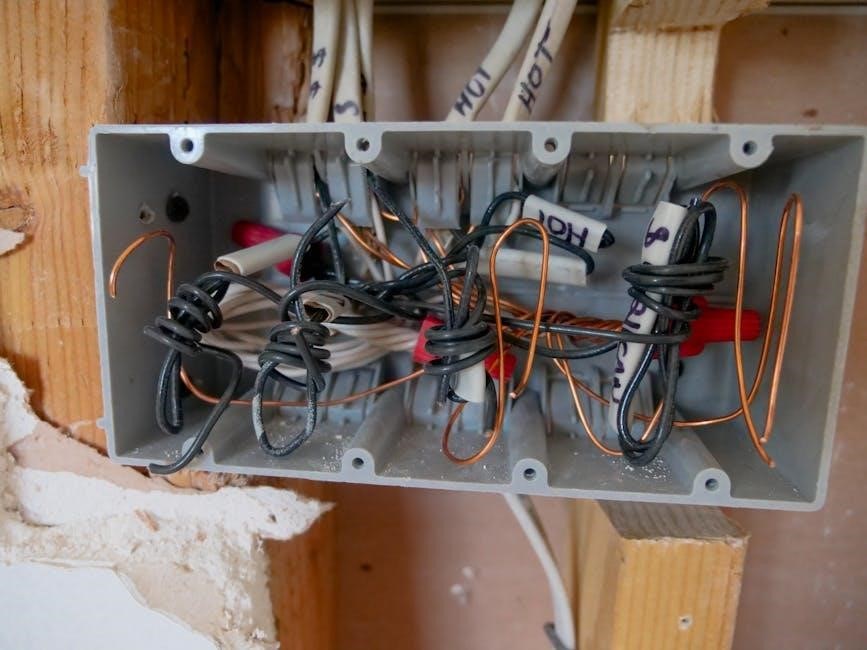
Wiring Diagrams and Connections
Refer to the wiring diagram in the Goodman AMST manual for precise connections. Ensure terminals match specifications and connections are secure to prevent electrical issues during operation.
6.1 Understanding the Wiring Diagram
The wiring diagram in the Goodman AMST manual is essential for proper electrical connections. It details color-coded wires, connectors, and terminal locations. Ensure all components, such as sensors, thermostats, and expansion valves, are correctly linked. Refer to the diagram for specific instructions on connecting the humidistat, airflow adjustments, and system controls. Proper interpretation prevents electrical issues and ensures efficient system operation. Always follow the manual’s guidelines for accurate wiring configurations.
6.2 Connecting Sensors and Controls
Connect sensors and controls carefully to ensure precise system operation. The humidistat, if used, adjusts cooling airflow to 85% when closed. Refer to the installation manual for specific wiring instructions. Connect the Schrader valve for pressure checks and ensure thermal expansion valves are properly linked. The multi-speed ECM blower motor requires accurate control connections for energy efficiency. Verify all sensors, such as temperature and pressure sensors, are securely attached to monitor system performance effectively. Proper connections ensure reliable operation and optimal energy use.

Troubleshooting Common Issues
Identify common installation mistakes, such as incorrect wiring or sensor connections. Refer to the manual for resolving electrical and system malfunctions, ensuring proper fixes and optimal performance.
7.1 Identifying Common Installation Mistakes
Common mistakes include improper wiring connections, misaligned components, and incorrect refrigerant line setups. Ensure all electrical connections match the wiring diagram and verify proper system alignment during installation. Incorrect installation of thermal expansion valves or humidistats can lead to performance issues. Always refer to the Goodman AMST manual for specific guidance to avoid these errors and ensure optimal system functionality and efficiency.
7.2 Resolving Electrical and System Malfunctions
Address electrical issues by checking wiring connections and ensuring they match the provided diagrams. Verify circuit breakers and fuses are functioning correctly. For system malfunctions, inspect refrigerant lines for leaks and ensure proper airflow. Refer to the troubleshooting section in the Goodman AMST manual for step-by-step solutions. Resetting the system or replacing faulty components may resolve common issues, restoring efficiency and performance.

Maintenance and Service Tips
Regularly clean filters and inspect the system to ensure optimal performance. Schedule annual professional maintenance to check refrigerant levels and electrical connections, preventing costly repairs.
8.1 Regular Maintenance Schedule
A regular maintenance schedule ensures the Goodman AMST system operates efficiently. Monthly tasks include cleaning air filters and checking for blockages. Quarterly, inspect drain lines and condenser coils. Annually, schedule a professional to check refrigerant levels, electrical connections, and system performance. This routine helps prevent breakdowns, reduces energy bills, and extends the system’s lifespan. Always follow the manufacturer’s guidelines for optimal results and warranty compliance.
8.2 Cleaning and Inspecting the System
Cleaning and inspecting the Goodman AMST system is essential for maintaining efficiency. Regularly clean or replace air filters to ensure proper airflow. Inspect condenser coils and drain lines for debris or blockages. Use a soft brush or vacuum to clean internal components gently. Check for leaks, corrosion, or loose connections. Perform these tasks quarterly, or more often in dusty environments. Annual professional inspections are recommended to identify potential issues early and ensure optimal performance.
Proper installation and adherence to this manual ensure optimal performance, energy efficiency, and system reliability. Schedule regular maintenance to uphold efficiency and extend the unit’s lifespan effectively.

9.1 Final Checks and System Testing
After installation, conduct thorough system tests to ensure all components function correctly. Verify airflow, temperature settings, and electrical connections. Check for leaks in refrigerant lines and test humidity controls. Ensure the unit operates quietly and efficiently across all settings. Refer to the manual for specific testing procedures to confirm everything works as intended. Proper system testing ensures reliability and optimal performance from the start.